ОТКОПАЛОСЬ ЗДЕСЬ
Получился хаос при копировании. Знаю)))))
ВИДИМО Я СЕГОДНЯ- МОЯ ЖИЗНЬ, КОГДА ХОЧУ, ТОГДА И ДУРА.
Простите. Третий день знакомлюсь и осваиваю EQ7
Фотографии сдвинула и уменьшила, с текстом-УВЫ.С Дураком ты все время занят. Это сегодня про меня))))) Любимое слово сегодня у меня)))))) Ласковое оно. Только прислушайтесь -Дура, Дурочка, Дуреха, Дурище. Какая музыка)))))


 If you have read through the pattern for Twilight Gardens, and looked carefully at the photos of the quilt, you may have noticed that block 3 of the quilt is the same pattern as block 1 and block 4 is the same as block 2. Of course the fabrics will change, but the construction steps are the same. It is fun to see the same block made with different fabric choices, so you might be giving that a little thought before selecting fabrics for next month. I like to lay out a few fabric possibilities and view them next to the blocks that have already been made. After all, they will all reside in the same sampler quilt once finished. I think you will find that if you do this, you will easily be able to select a few fabrics for your next block.
When choosing your fabrics for block 2, remember it's placement in the quilt is top and center. Your eyes are drawn to this position, and having a block with a little more contrast and color may balance out some of the focus on the Daylilies and Twinkling Stars in the bottom two corner blocks. I made sure to choose a couple of red toned fabrics for my center star, and I used pure black as my darkest fabric. I wanted a very high contrast between all the outer star points and my background fabric, so I picked one of the lightest tans for star points to set against the black.

As I mentioned in my last article, I try to incorporate one or two patterned fabrics into each block as well. Many of the fabrics in this quilt read as simple solids and textures, so the use of a patterned fabric will stand out, and give your block a lot of visual interest. One of the patterned fabrics I chose for this block was the red plaid. I put this right in the very center of the inner star. I used one other patterned fabric, a nice medium scale brown/gray plaid that I used for the 4 outer block corners.
 Follow the cutting directions carefully. It is very important that you cut some of the triangles as half square triangles (square cut in half once diagonally), and some as quarter square triangles (square cut twice diagonally, yielding four triangles). Not only does this affect the size of the triangles, it also affects which sides of the triangles are straight of grain, and which are bias edges. We always try to keep the grain of the fabrics going the same direction in the block if possible. It will yield a block that is more stable with less chance of distortion.
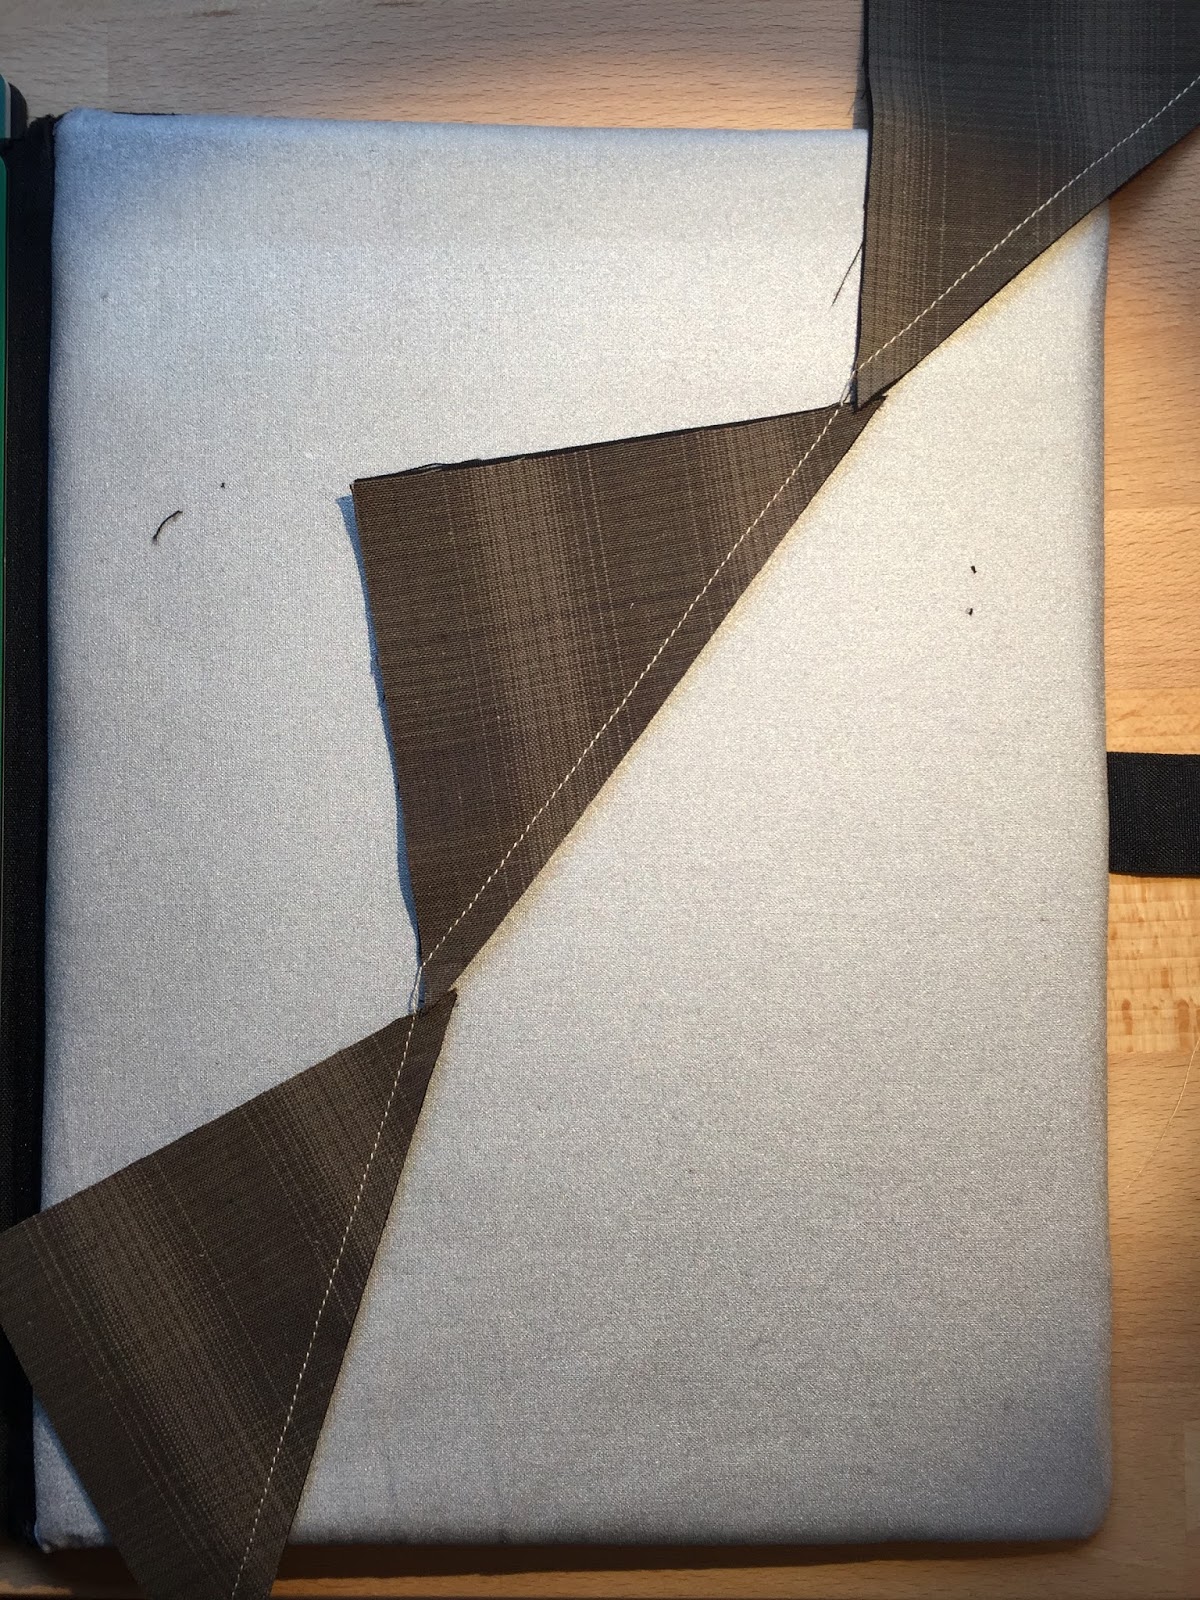
 At first glance, Block 2 looks like quite a complex block, but it is made from very simple units, and as you see each step, you will realize it is not difficult at all. The designer does make one very good suggestion with this block, and that is to press your seams open. I did this throughout most the block, and it made construction a lot easier. Note the open seams in these two photos. You will also see seams pressed open in later photos as we begin to put the units together.
Begin by making large and small half square triangle units A/B and a/b. These are cut a little oversized and then trimmed down to the correct size as in the previous block.

You will then make rectangular units F/G by lining up a square G over one end of a rectangle F, right sides together. On 4 of these, draw a diagonal line corner to corner on the back of square G. Sew on this line and clip extra corner fabric away leaving just a 1/4" seam allowance. Repeat these steps with the other 4 rectangles, but draw the diagonal line in the opposite direction, so you end up with 4 right hand units and 4 left hand units. They will be mirror images of each other. Flip the triangle corners and press.
 Lay out the block corner units using one large and one small half square triangle unit, and one each left and right handed rectangle unit.


Press the seams open to reduce bulk.
You will then make 4 large hourglass units from quarter square triangles C, D, and E


 The seams on this unit can be pressed in rotation, like a pinwheel. See on the back photo the 4 seams are pressed in a counter clockwise direction. This allows the center seam intersection to lay flatter. This can be done just about any time you have a 4-way corner in piecing.
Our next unit is the Flying Geese. They are made the same way as the rectangle units above. Lay a square d over one end of a rectangle c, right sides together. Draw a diagonal corner to corner on the back of the square and sew on this line. Trim the excess triangles leaving a 1/4" seam allowance. Flip and press these triangle corners. Now add a second square d on the opposite end of the rectangle c. This square will slightly overlap the corner of the previous piece.
 Draw the diagonal line in the opposite direction to the first one, as seen in the photo above. Sew on this line, trim and press the corner. Your finished Flying Geese units should have a 1/4" allowance above the point.
 You will assemble 4 side units, each from one Flying Geese unit, and one Hourglass unit. Then lay out your side units, corner units and the large center square to form the block. Sew together in rows, pressing the seams open. This is important. There is just too much bulk generated from all the seams in this block. As you sew the final rows together, press the seams open again.


You may have noticed that I have changed the placement of two of the fabrics in this block from the original pattern. I rotated the small half square triangles in the corner units so the gray is joining the red inner star points rather than the black. When I was laying out this block, I just liked the way this looked better. I just point this out to show you that you can make whatever changes you want during construction of your blocks. It is your quilt, and a pattern is only a guideline, and the layout is not set in stone.
Have fun with these blocks


 First a word about choosing fabrics. The kit includes lots of fabrics to choose from, and you don't have to use every one, but the scrappier look will be achieved by including as many of the fabrics as you can. The palette of fabrics distinctly leans towards darker fabrics, so a dark is considered black or near black. There are medium darks, mediums, and lights. The lights might be considered mediums in another project, but relative to the fabrics in this quilt, they are the lightest. I suggest picking fabrics from these groups as the pattern specifies, and as you select for each block, pick a group that all go together nicely, and include one or more patterned fabrics for texture and interest.
I have selected these 6 fabrics at left, with the top three used for the larger, outer star, and the bottom 3 used for the smaller, inner star.


Be sure when you are cutting your pieces, to cut the triangles for A, B, and D as half square triangles, and the triangles for C as quarter square triangles (as pictured in the center above). This will assure that the outside edges of your block will all be straight of grain.
Note that my medium dark fabric for the background of the inner star (charcoal gray) is just a bit lighter than the pure black fabric (dark), and I have also chosen two lights for the center star. One goes in the center (space d) and the other is used for the star points (space c). Although the two lights are very similar in value, they have a nice variation in texture.
Assembling the pieces is pretty straightforward according to the printed pattern. Sewing pieces A and B together to form the outer corner squares of the block, and sewing D's to triangle C making flying geese units that are used as the outer star points.


The flying geese units for the inner star points are made using a slightly different method. Start with a rectangle and a square. Lay the square over one side of the rectangle aligning the edges. draw a line on the diagonal of the square, and sew on that line. Trim excess fabric beyond 1/4" from the seam. Flip and press the corner. Repeat this with a second square on the other end of the rectangle, sewing the diagonal in the opposite direction.


 The photo at right shows the units to form the inner star. You may notice these yarn dyed cottons will fray a little more than your typical prints. Just use a little care when cutting and moving your pieces, and this should not give you any trouble at all. Use the center square, 4 flying geese units, and 4 corner squares. Assemble the block in rows. Press your seams toward the corner squares on the top and bottom rows, and towards the center square on the middle row. The intersections of your rows should then nest nicely. The final two seams should either be pressed toward the center of the block, or pressed open if it lays flatter that way.
 The resulting star block will be used at the center in the larger star. Assemble the large star just as the small one, using the small star as the center, 4 flying geese units, and the 4 half square triangle units as the block corners. Be sure to arrange the HST corner blocks with the light and dark in the correct location.
Put this star together just as before, in rows, pressing the seams in the same direction we did for the small star. You will likely find the final two row seams on the block will want to be pressed open to help your block lay flat.


Your block should measure 12 1/2" square and will finish in the quilt at 12". If you should have any questions, or would like to leave feedback about this block, or the Twilight Gardens quilt, use the comments section below.
Thanks for following along.
Получился хаос при копировании. Знаю)))))
ВИДИМО Я СЕГОДНЯ- МОЯ ЖИЗНЬ, КОГДА ХОЧУ, ТОГДА И ДУРА.
Простите. Третий день знакомлюсь и осваиваю EQ7
Фотографии сдвинула и уменьшила, с текстом-УВЫ.С Дураком ты все время занят. Это сегодня про меня))))) Любимое слово сегодня у меня)))))) Ласковое оно. Только прислушайтесь -Дура, Дурочка, Дуреха, Дурище. Какая музыка)))))
Twilight Gardens Block 3
Before we begin talking about block 3, I need to mention a couple of errors in the printed pattern for block 2. They are not errors of cutting or dimensions. When assembling the flying geese units that form the center star points, the directions should read, "layer a light 2" d square onto rectangle c as shown". You may not have even noticed this was wrong.
The other error is actually in the diagram for the outer corner units. Beginning halfway through the pattern, the small a/b half square triangle units are flipped with the dark and light side reversed from where they should be. Fortunately, the star block looks great made either way, so if you followed the layout this way, it is not a serious problem. I assembled my block this way, and I actually liked it better than the layout in the actual quilt.
Moving on, as I mentioned last month, the block patterns for blocks 3 and 4 are identical to the block patterns for blocks 1 and 2 respectively. So we have been through the construction sequence already. I will tell you a bit about how I selected fabrics for this block. I wanted two things in this block - a center star that popped, and outer corners that used the hombre plaid. I love using hombre plaids in quilt blocks. They tend to have this luminescent look about them, almost as if they were lit from behind. My outer star points are cut from a fairly dark gray. It has enough contrast with the pure black background to show up nicely, but not enough to take away from the center star.
Just a small reminder that when you are cutting out your triangle pieces for this block, do make sure you cut them as the pattern states, as either quarter square triangles, or half square triangles as in the two example photos. This is very important, as the sides with a bias edge should always be pieced into the block, and not fall along the outer edge. This is because the bias edges have more stretch and give to them, and you do not want the outside edges of the blocks to stretch out of shape before you have a chance to sew them into the quilt top.
I also wanted to mention that many pieces in these blocks lend themselves to chain piecing. The half square triangle units can be sewn in a chain of 4, as can be the flying geese. Adding one side triangle to one center triangle for each of 4 units, then pressing and adding the next four side triangles in a chain. This not only saves time, but often results in more accurate piecing.
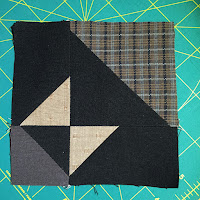
And here is the completed block (with correct placement of the lower corner. This block has a very distinct neutral color as compared with the first couple of blocks. All the fabrics in this quilt are fairly muted in color, but some lean more towards green or brown or gray or red, so I am trying to get a mix of block colors. In block 4, I think I am going to pick a mix that shows a bit more green-gray coloring.
The block for May (block 5) will be our first applique block. There are many methods of doing applique that will work, and I encourage you to use your favorite method. If you have a method you like, you may want to get started on that block a little early, as the applique might take you a little longer than the piecing we have been doing. If you are new to applique, or don't have a preferred method, I will be demonstrating a method for preparing your applique pieces using freezer paper. The pieces may then be appliqued to the background either by hand or machine. I will talk more about this in the next article.
Thanks for following along.
The other error is actually in the diagram for the outer corner units. Beginning halfway through the pattern, the small a/b half square triangle units are flipped with the dark and light side reversed from where they should be. Fortunately, the star block looks great made either way, so if you followed the layout this way, it is not a serious problem. I assembled my block this way, and I actually liked it better than the layout in the actual quilt.
 | |||
| My fabric selections |
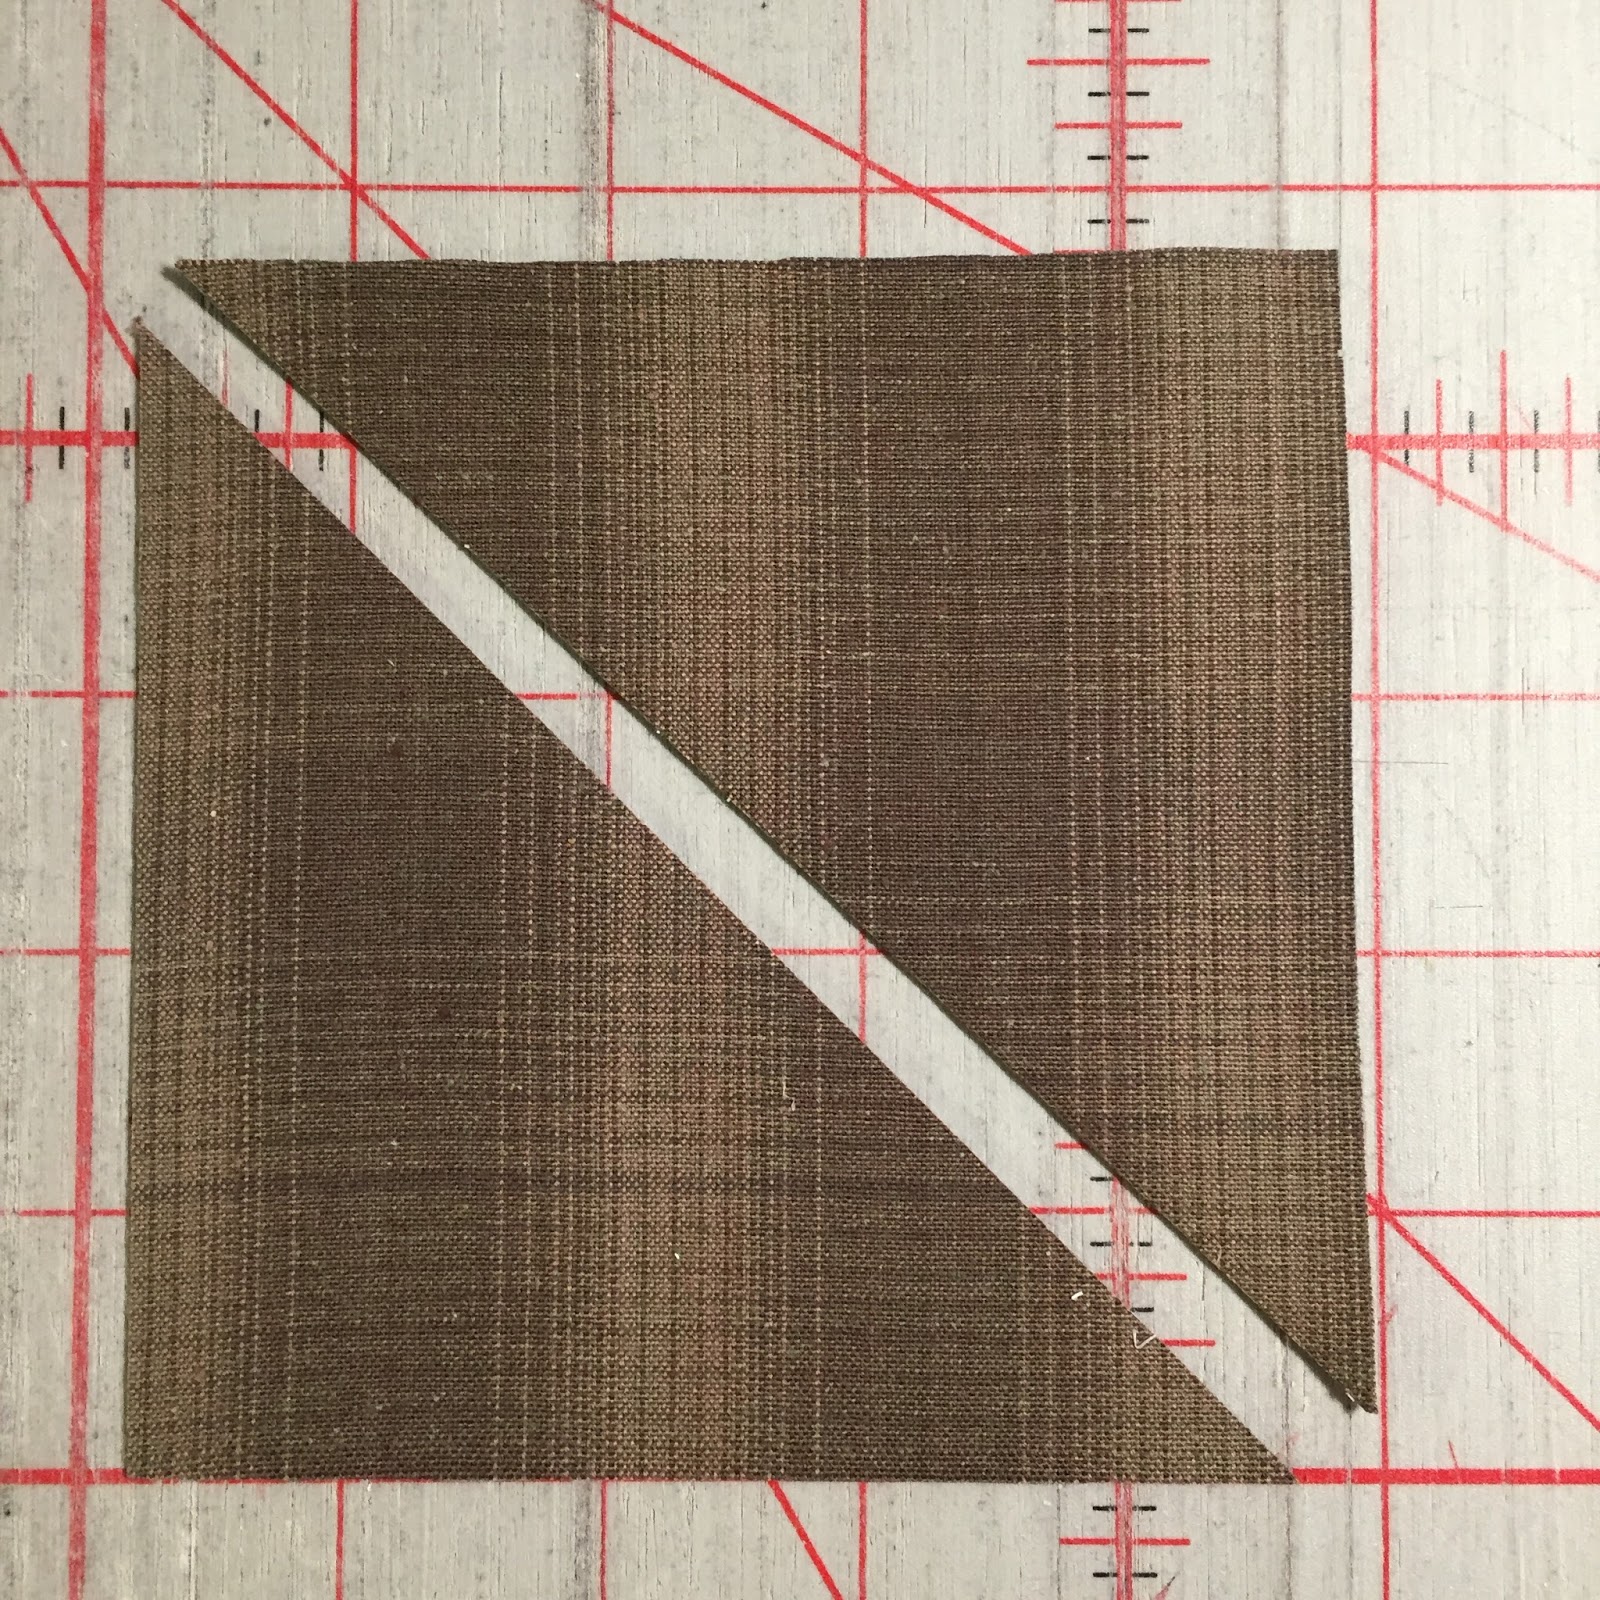 |
| Half Square Triangles |
 |
| Quarter Square Triangles |
 |
| Chain piecing HST's |
The layout for this block is identical to that of block 1. If you have trouble getting any of the seams to lay flat, consider pressing them open to divide the bulk in two directions. The center block at left forms the center square when laying out the full block. (Yes, I realize the photo on the right has an error. The bottom right corner square is turned 180 degrees from where it should be in the block layout photo. Unfortunately, I sewed the block together and missed the opportunity to take a corrected photo. oops). The photo below is correct, however.
 |
| Center Star Layout |
 |
| Entire Block Layout |
 |
| Finished Block - measures 12 1/2" square |
The block for May (block 5) will be our first applique block. There are many methods of doing applique that will work, and I encourage you to use your favorite method. If you have a method you like, you may want to get started on that block a little early, as the applique might take you a little longer than the piecing we have been doing. If you are new to applique, or don't have a preferred method, I will be demonstrating a method for preparing your applique pieces using freezer paper. The pieces may then be appliqued to the background either by hand or machine. I will talk more about this in the next article.
Thanks for following along.
Steven
Wednesday, February 8, 2017
Continuing On - Twilight Gardens Block 2


 If you have read through the pattern for Twilight Gardens, and looked carefully at the photos of the quilt, you may have noticed that block 3 of the quilt is the same pattern as block 1 and block 4 is the same as block 2. Of course the fabrics will change, but the construction steps are the same. It is fun to see the same block made with different fabric choices, so you might be giving that a little thought before selecting fabrics for next month. I like to lay out a few fabric possibilities and view them next to the blocks that have already been made. After all, they will all reside in the same sampler quilt once finished. I think you will find that if you do this, you will easily be able to select a few fabrics for your next block.
When choosing your fabrics for block 2, remember it's placement in the quilt is top and center. Your eyes are drawn to this position, and having a block with a little more contrast and color may balance out some of the focus on the Daylilies and Twinkling Stars in the bottom two corner blocks. I made sure to choose a couple of red toned fabrics for my center star, and I used pure black as my darkest fabric. I wanted a very high contrast between all the outer star points and my background fabric, so I picked one of the lightest tans for star points to set against the black.

As I mentioned in my last article, I try to incorporate one or two patterned fabrics into each block as well. Many of the fabrics in this quilt read as simple solids and textures, so the use of a patterned fabric will stand out, and give your block a lot of visual interest. One of the patterned fabrics I chose for this block was the red plaid. I put this right in the very center of the inner star. I used one other patterned fabric, a nice medium scale brown/gray plaid that I used for the 4 outer block corners.

 At first glance, Block 2 looks like quite a complex block, but it is made from very simple units, and as you see each step, you will realize it is not difficult at all. The designer does make one very good suggestion with this block, and that is to press your seams open. I did this throughout most the block, and it made construction a lot easier. Note the open seams in these two photos. You will also see seams pressed open in later photos as we begin to put the units together.
Begin by making large and small half square triangle units A/B and a/b. These are cut a little oversized and then trimmed down to the correct size as in the previous block.

 | ||
| Note the diagonal direction |
You will then make rectangular units F/G by lining up a square G over one end of a rectangle F, right sides together. On 4 of these, draw a diagonal line corner to corner on the back of square G. Sew on this line and clip extra corner fabric away leaving just a 1/4" seam allowance. Repeat these steps with the other 4 rectangles, but draw the diagonal line in the opposite direction, so you end up with 4 right hand units and 4 left hand units. They will be mirror images of each other. Flip the triangle corners and press.


Press the seams open to reduce bulk.
You will then make 4 large hourglass units from quarter square triangles C, D, and E


Our next unit is the Flying Geese. They are made the same way as the rectangle units above. Lay a square d over one end of a rectangle c, right sides together. Draw a diagonal corner to corner on the back of the square and sew on this line. Trim the excess triangles leaving a 1/4" seam allowance. Flip and press these triangle corners. Now add a second square d on the opposite end of the rectangle c. This square will slightly overlap the corner of the previous piece.


You may have noticed that I have changed the placement of two of the fabrics in this block from the original pattern. I rotated the small half square triangles in the corner units so the gray is joining the red inner star points rather than the black. When I was laying out this block, I just liked the way this looked better. I just point this out to show you that you can make whatever changes you want during construction of your blocks. It is your quilt, and a pattern is only a guideline, and the layout is not set in stone.
Have fun with these blocks
Steven

Thursday, January 5, 2017
Twilight Gardens Block 1


I have selected these 6 fabrics at left, with the top three used for the larger, outer star, and the bottom 3 used for the smaller, inner star.


Be sure when you are cutting your pieces, to cut the triangles for A, B, and D as half square triangles, and the triangles for C as quarter square triangles (as pictured in the center above). This will assure that the outside edges of your block will all be straight of grain.
Note that my medium dark fabric for the background of the inner star (charcoal gray) is just a bit lighter than the pure black fabric (dark), and I have also chosen two lights for the center star. One goes in the center (space d) and the other is used for the star points (space c). Although the two lights are very similar in value, they have a nice variation in texture.
Assembling the pieces is pretty straightforward according to the printed pattern. Sewing pieces A and B together to form the outer corner squares of the block, and sewing D's to triangle C making flying geese units that are used as the outer star points.


Be sure to trim down your half square triangles. Line up the diagonal reference line on your ruler with the diagonal seam, and trim to 3 1/2" square. Also, trim your dog ears off your flying geese units. It will make your final seams less bulky, and the finished block will lay flatter.


The flying geese units for the inner star points are made using a slightly different method. Start with a rectangle and a square. Lay the square over one side of the rectangle aligning the edges. draw a line on the diagonal of the square, and sew on that line. Trim excess fabric beyond 1/4" from the seam. Flip and press the corner. Repeat this with a second square on the other end of the rectangle, sewing the diagonal in the opposite direction.


Put this star together just as before, in rows, pressing the seams in the same direction we did for the small star. You will likely find the final two row seams on the block will want to be pressed open to help your block lay flat.


Your block should measure 12 1/2" square and will finish in the quilt at 12". If you should have any questions, or would like to leave feedback about this block, or the Twilight Gardens quilt, use the comments section below.
Thanks for following along.
Steven
Tuesday, December 27, 2016
Organizing Twilight Gardens
Whether you are purchasing a kit for this quilt from One World Fabrics, or you are putting together your own collection of fabrics, it is really easiest to organize them, overall by value, and then by color or scale of pattern.
 The quilt pattern specifies the use of light, dark, medium, etc. fabric pieces for each block, and if you have your fabrics divided this way to start with, it makes it very easy to pick fabrics from these groups that will go well together in a block. Some fabrics in the kit have warmer tones and some cooler tones. The solid black is used in many blocks as it really provides a dark ground and showcases the other fabrics, allowing you to see their subtle colors. A few of these basic fabrics lean a little toward red, others lean a bit toward green. There are enough to choose from that you can put together ones from each group that emphasize one color in a block. Keep in mind that a medium-light in one block, might be a medium in another block depending on the other fabrics you put with it.
 There are also a few fabrics which are distinct and have a special place in the quilt. Some of these include the blues that are used in the tulip applique and the basket blocks, the Ecru that is used as the light flowers, the stronger reds which will be the inner border of the quilt, as well as appearing in several of the blocks and sashings. The sashings, including both the piano keys and the checkerboard, and are made from leftover bits from the block piecing and applique. They include little pieces of everything, and you are free to emphasize any of the fabrics you like the best when putting these together. There is a dark charcoal with subtle stripe included with this pack in the kit. This is used as the background for the tulip block.
 Many of the weaves included in the kit are very simple, and read mostly as one color, however, it is really nice to incorporate fabrics with a little more pattern and visual interest. In each block, try to use one patterned fabric that will stand out against some of the tone on tones. It may be the background surrounding a star, or even the points of a star. Plaids and fancy weave patterns will look great if you scatter them throughout the quilt, and don't forget to use them in the sashings as well. The sashings revisit all the fabrics used in each block and carry those colors and textures to other areas of the quilt.
 We look forward to starting on block 1 of Twilight Gardens right after the 1st of the year. Be sure to read through the pattern to familiarize yourself with the sections of the quilt, the fabrics used in each block, the techniques used, and the overall assembly including piano key and checkerboard sashings.
Remember, One World Fabrics's kit for this quilt is not packaged monthly, but rather as a single quilt kit, allowing you to pick the placement of fabrics in blocks as you choose during construction. There are no print fabrics in the kit; all the fabrics are yarn dyed wovens, giving the finished quilt a really beautiful, textured look. Plenty of fabric provides lots of choices (and lots of leftovers for your stash :-) ). If you would like to order a kit for Twilight Gardens, click here.
If you have any questions about this quilt, please leave a comment. Thanks, and Happy New Year!
Steven
 The quilt pattern specifies the use of light, dark, medium, etc. fabric pieces for each block, and if you have your fabrics divided this way to start with, it makes it very easy to pick fabrics from these groups that will go well together in a block. Some fabrics in the kit have warmer tones and some cooler tones. The solid black is used in many blocks as it really provides a dark ground and showcases the other fabrics, allowing you to see their subtle colors. A few of these basic fabrics lean a little toward red, others lean a bit toward green. There are enough to choose from that you can put together ones from each group that emphasize one color in a block. Keep in mind that a medium-light in one block, might be a medium in another block depending on the other fabrics you put with it.


Remember, One World Fabrics's kit for this quilt is not packaged monthly, but rather as a single quilt kit, allowing you to pick the placement of fabrics in blocks as you choose during construction. There are no print fabrics in the kit; all the fabrics are yarn dyed wovens, giving the finished quilt a really beautiful, textured look. Plenty of fabric provides lots of choices (and lots of leftovers for your stash :-) ). If you would like to order a kit for Twilight Gardens, click here.
If you have any questions about this quilt, please leave a comment. Thanks, and Happy New Year!
Steven